 |
How To Run X On Your PC
using X-Deep/32
(Draft Version 2.3)
http://www.mtsu.edu/~untch/share/XDP/XDP.html
Note: Reading and using this document on a Web browser is recommended.
Although it is possible to use this document in a hardcopy format,
it is more difficult due to the lack of hyperlinks and the presence
of page breaks.
(Note: Because there have been reported problems
with using the Netscape/Mozilla Web browsers with this document,
the use of Internet Explorer is recommended.)
|
Why X?
Computer users often wish to run application programs
that have graphical user interfaces.
The use of menus and icons simplifies computer use.
When the application program running is local to the PC
(that is, when the program resides and executes on the PC we are using)
providing a graphical environment is straightforward:
simply access the PC's underlying graphics system directly.
But when the program running is remote, that is,
is running on another computer, then another mechanism for
displaying the graphics is needed.
The X Window System,
or just X for short,
is a graphic display system capable of
displaying graphical images generated by remotely executing programs.
Software developed utilizing X
can run either locally or remotely.
The X software also provides a portable
solution to graphics display.
Thus software developed utilizing X,
instead of some specific platform's graphics system, is inherently portable;
the unique details for displaying graphics on different platforms
(e.g., MacOS, Win/XX, UNIX) can be ignored.
As long as an X server is running on the
user's computer,
X-based application programs can be run.
Both xterm and NEdit are
X-based application programs.
So to use these programs from home,
you need an X server program.
Which X server?
Hummingbird's
Exceed®
product includes an excellent X server
and is widely used in the computer labs on campus.
However that product sells for several hundred dollars.
In August 2004, Pexus Systems, Inc.
made available as
freeware
their
X-Deep/32 X server.
This document describes how to install and use X-Deep/32.
Obtaining and Installing the X-Deep/32 server
Most current PC systems, running Windows 95/98/ME/NT/2000/XP,
should satisfy the X-Deep/32
system requirements.
At least 55MB of disk space are needed for installation.
Download the installation file xdp40Basic.exe
(~ 9MB) to your PC's desktop.
Do this by right-clicking the following link and selecting
"Save Target As..."
(or, in Netscape/Mozilla, "Save Link As...")
http://www.mtsu.edu/~untch/share/XDP/xdp40Basic.exe
(Alternatively you can download the installation file from Pexus
using the following link:
http://www.pexus.com/Download/Files/xdp40/basic/xdp40Basic.exe.)
The icon for the downloaded installation
file should look something like this:
|

|
Locate and execute this downloaded file by (double) clicking its file icon.
Once installation begins, you should see the following screen:
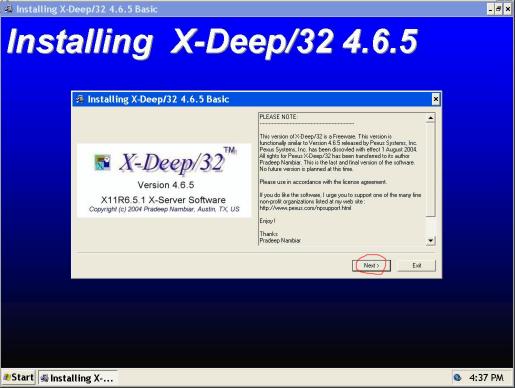
Click on the Next button and continue to read and respond to the
installation queries on the next few screens. Use the suggested defaults.
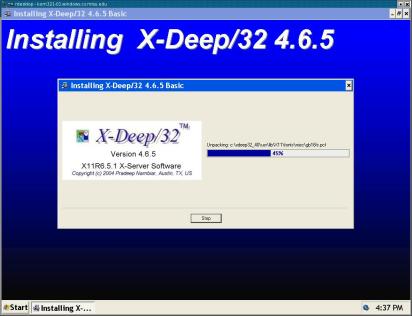
Once you have responded to all the queries,
the installation will go into a (short) file unpacking/copying phase:
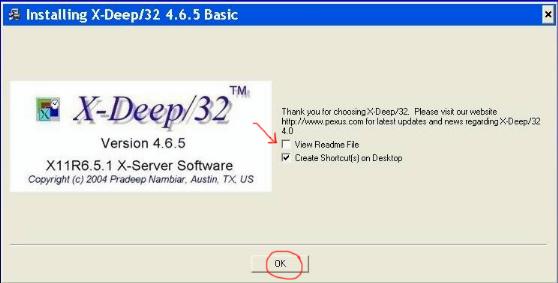
Once all the files are installed, the following window will be presented.
Remove the check mark next to View Readme File and
click the OK button.
The final window opened by the installation (it may take a while)
is the following Start Menu items display.
We do not need this window displayed.
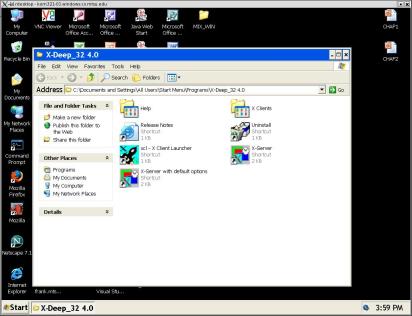 Close the \Start Menu\Programs\X-Deep_32 40 window.
Continue on to the next section and configure the X-Deep/32 server.
Configuring the X-Deep/32 server
The X-Deep/32 program needs to be configured. This needs to be done only once,
the first time the program is executed after installation.
Start the X-Deep/32 program by (double) clicking its file icon.
The X-Deep/32 program icon
should look something like this:
|

|
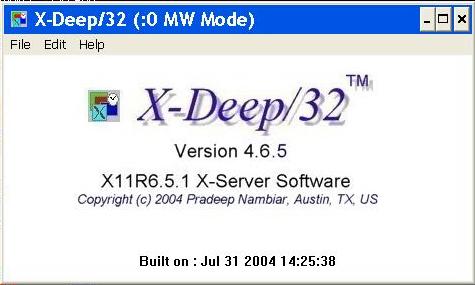
Once the program in invoked, the first screen you will see is this:
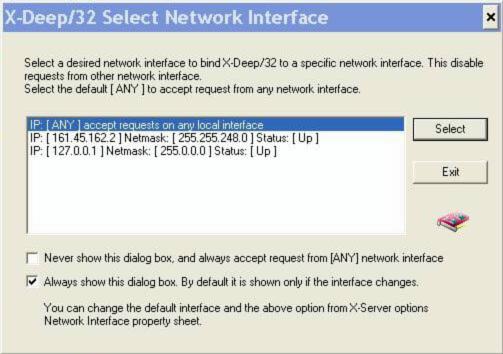
You will need to modify two settings on this screen as indicated below.
Highlight the IP: [127.0.0.1] entry in the list
(it should be the last entry).
Also, remove the check mark from the
"Always show this dialog box." option.
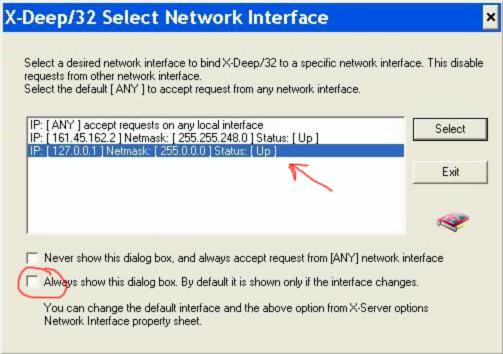
Once you have modified these settings,
click the Select button to continue.
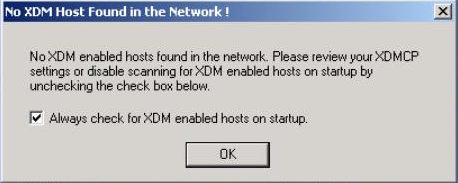
If all goes well,
the following will be displayed on your screen for a short while:

Eventually one of two possible screens will appear,
depending on your network connection.
Either you will get the following
"No XDM Host Found in the Network" screen:
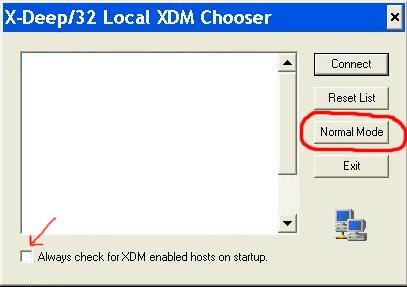
or the following Local XDM Chooser window will appear.
(Although your window will be similar to the one below, do not
be surprised if there are entries in the list area---ignore any such entries.)
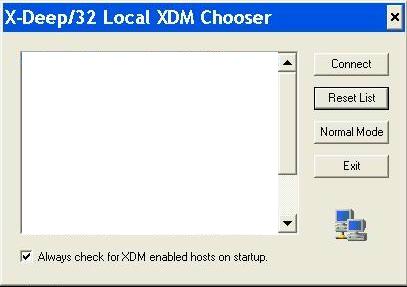
Regardless of which screen you got,
remove the check mark from the
"Always check for XDM enabled hosts on startup." option.
Once the check mark is removed, either click the OK button
or, if you got the Local XDM Chooser window,
click the Normal Mode button, as shown below.
Next, a full-screen display
(called the Root Window) similar to the following will be displayed.
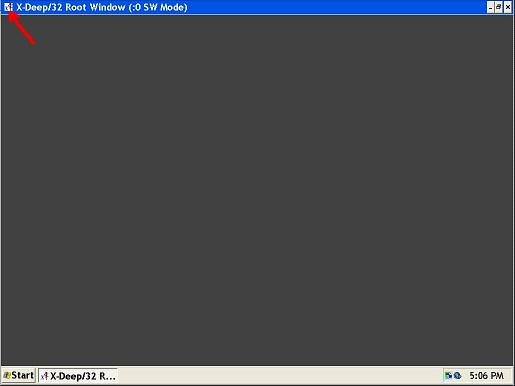
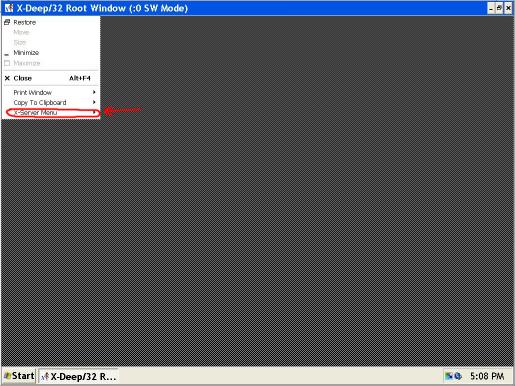
Pull down the options menu for this window by clicking on the options
button on the upper left side of the window frame (pinpointed above
by the red arrow). Without releasing the mouse button, select the
X-Server Menu as shown in the next picture.
...and finally select the X-Server Options entry, as shown next:
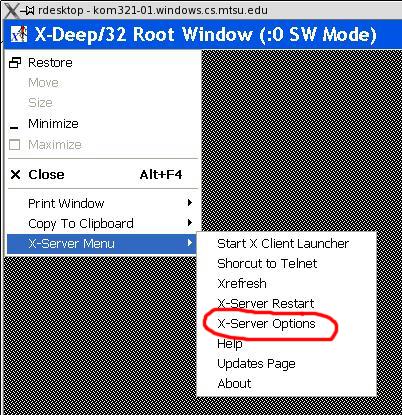
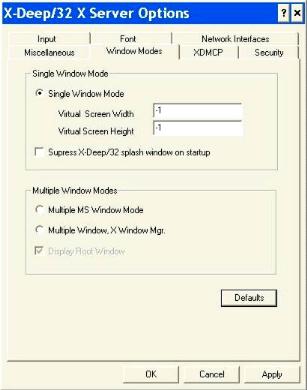
The X-Deep/32 X Server Options window should now display.
This is a tabbed window. We need to change two of the tabbed
sections. First click on the Window Modes tab and make
the changes shown:
| Before |
|
After |
|
Change radio button and remove check mark, as shown.
Then click Apply button.
|
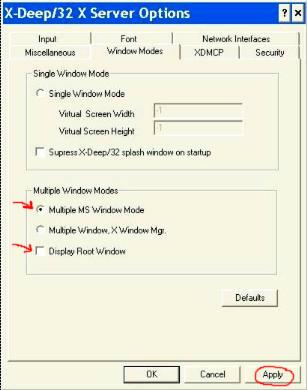
|
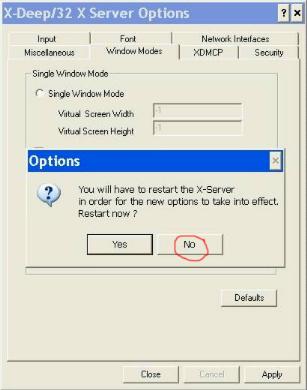
On clicking the Apply button, a pop-up will appear.
The system will ask if you want to restart the X-server program.
Answer no by clicking the No button.
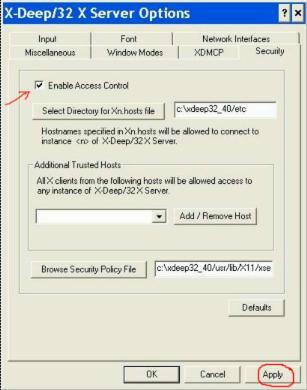
Next click on the Security tab and make the change shown:
| Before |
|
After |
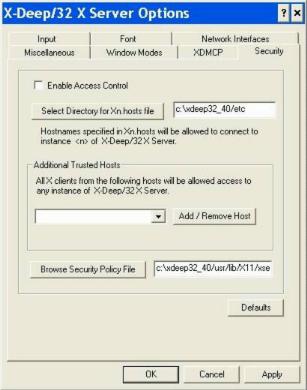
|
Check mark Enable Access Control.
Then click Apply button.
|
|
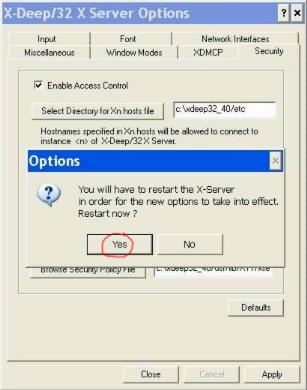
On clicking the Apply button, a pop-up will again appear.
The system will ask if you want to restart the X-server program.
Answer yes this time by clicking the Yes button.
(Note: This will only restart the X-server program,
not the entire computer.)
That completes the X-Deep/32 server configuration.
Starting the X-Deep/32 server
Whenever the X-Deep/32 server is running, the start tray
(in the lower right corner of the monitory display) will display
the X-Deep/32 server icon, resembling the icon pointed to
by the the red arrow in the following picture:
 (Note: If you just completed the configuration steps above, the
server will be running because of the restart.)
(Note: If you just completed the configuration steps above, the
server will be running because of the restart.)
If the server is not running,
start the X-Deep/32 program by (double) clicking the program
icon on the desktop.
The X-Deep/32 program icon
should look something like this:
|
|
Connect and Log On:
The suggested way of connecting to either frank
or one of the CSCI Linux computers is
using the
PuTTY
program and using PuTTY's implementation of the SSH protocol.
(Don't worry about what the SSH protocol is;
SSH stands for Secure SHell and that's about
all you really need to know about the protocol.)
You must use PuTTY version 0.53b or later for this procedure to work.
-
If you don't already have the PuTTY program, you can download it from this link
http://the.earth.li/~sgtatham/putty/latest/x86/putty.exe.
Remember where you put the putty.exe file;
a good place to put it is inside the C:\xdeep32_40 directory.
You will need to create your own two customized PuTTY shortcut icons
named frank PuTTY and linux.cs PuTTY.
To create your own customized frank PuTTY shortcut icon,
put a shortcut to the putty.exe executable binary file
on your desktop.
Right-click the putty shortcut icon, select Properties,
and then click on the Shortcut tab. Locate the "Target:"
box; it will contain a line that invokes PuTTY.
For example, if the putty.exe file is located in the
C:\xdeep32_40 directory,
the "Target:" box will contain
C:\xdeep32_40\putty.exe
(on some systems, this may be enclosed in quotation marks:
"C:\xdeep32_40\putty.exe")
and append the following items to the end of what is there:
-X -ssh frank.mtsu.edu
(If your system had the quotation marks, append after the last quotation mark.)
For example, if the putty.exe file was located in the
C:\xdeep32_40 directory, the modified properties menu should
look something like this:
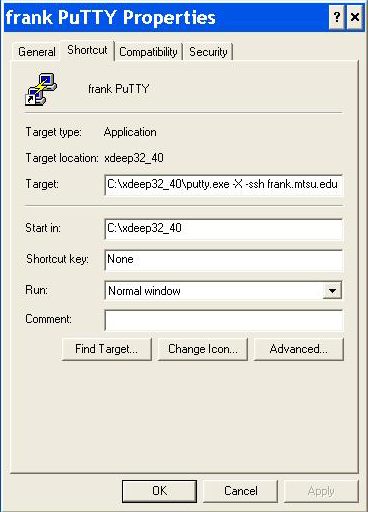 Rename the shortcut icon to read "frank PuTTY".
Follow a similar procedure to create your customized
linux.cs PuTTY shortcut icon.
Rename the shortcut icon to read "frank PuTTY".
Follow a similar procedure to create your customized
linux.cs PuTTY shortcut icon.
If you are not already connected to the Internet, do so now.
(Double) clicking on one of the customized PuTTY shortcuts
will connect you to the specified computer.
-
The first time you use PuTTY to connect to a system,
it is likely you will get a PuTTY Security Alert pop-up.
Click Yes to carry on connecting.

Log on in the usual manner.
(When PuTTY prompts "login as:", enter your account userid.
Next it will prompt you for your password. Enter your password.
If you make a mistake as you type either of these items, you may
use the backspace key to correct your mistake.)
Starting an X application
To run an X application, like nedit or xterm,
an X server must already be running.
Assuming an X server is running,
at the UNIX prompt in the PuTTY window, simply enter the command that
starts the X application.
For example, to start nedit, enter the UNIX command
% nedit
filename
&
Similarly, to open an xterm window, enter the UNIX command
% xterm &
Leaving the X Environment and Logging Off
When you are done, close all your
X applications.
Return to the PuTTY window you used to initially log on.
(You may ignore any warning/error messages
that may have appeared in the window
as a result of your closing the
X application windows.)
At the UNIX prompt, enter the
"exit"
command to completely log off the computer system.
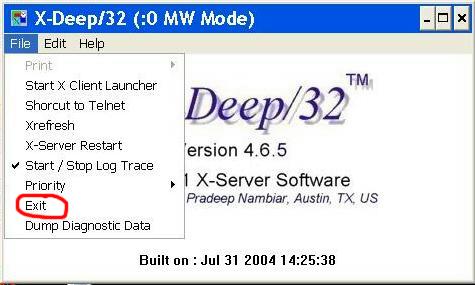
Stopping the X-Deep/32 server
You may leave the X-Deep/32 X server
running even if you have no
X applications active.
However, if you wish to terminate the program, follow the following steps.
-
Right click system tray icon.
-
This will produce the following options screen.
Click on File to obtain a pull-down menu.
-
Without releasing the mouse button,
slide down the menu and select Exit.
-
On the resulting pop-up,
click OK to confirm exit.

Additional sources of information: