
|
Installing/Configuring VcXsrv and PuTTy
(Draft Version 1.1)
http://www.mtsu.edu/~rwsmith/share/VcXsrv/VcXsrv.html
|
Installing VcXsrv
-
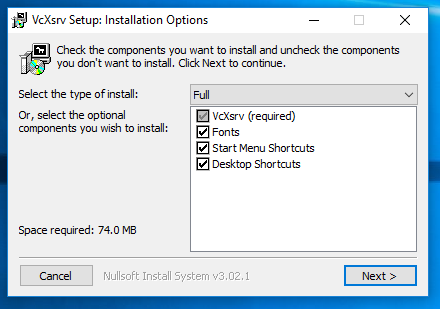
Download and install the latest VcXsrv from
https://sourceforge.net/projects/vcxsrv/files/latest/download
-
Check that the dropdown has Full selected and click Next
-
Leave the Destination Folder untouched and click Install

-
After the installation successfully completes you may click Close

Configuring VcXsrv
Once VcXsrv has been installed,
run the application called "XLaunch". If the shortcut is not on your desktop,
you can do this by pressing your Windows key and typing XLaunch, then clicking the Application that appears.
Or, you may instead navigate to the folder C:\Program Files\VcXsrv and execute the xlaunch application within there by double clicking on it.
After XLaunch has launched, follow the steps below to ensure your configuration is correct:
- Ensure Multiple Windows is selected and leave the display number as -1 before clicking Next.

- Check that "Start no client" is selected and click Next.

- Leave extra settings alone and click Next.

- Finally Click Finish

- You should see an X image appear on your taskbar as shown below. This indicates that the X-server is successfully running.

NOTE: If you close the X-server by right clicking the X icon in the
tray and selecting "exit" OR you restart your computer OR it
closes for any other reason, you can just relaunch XLaunch and follow the configuration steps.
Installing PuTTy
PuTTy can be downloaded from:
https://www.chiark.greenend.org.uk/~sgtatham/putty/latest.html.
Follow the default installation.
Configuring PuTTy
After launching the PuTTy application, you will need to make sure it
has been configured correctly. Follow every step below to ensure this:
- Select the Session category on the left:
- Set the Host Name ranger.cs.mtsu.edu
- Double check the Port is 22
- Make Sure the connection type has SSH selected

- Select the Data category located under Connection
-
Optional: You may wish to put your username (c-number) in the auto-login box to
save yourself some typing later.

-
Select the SSH category under Connection
Important: The X11 setting MUST be set. Without it the X-window system cannot find your PC for display and you will not
be able to use graphical applications located on ranger
from home.
- Expand SSH by clicking the +
- Select the X11 category
- Check the Enable X11 forwarding box

- Go back to the Session category
- Type some name for this connection in the "Saved Sessions" box. For the example I used "ranger".

- Then click the Save button. You should see the name you gave it appear under Default Settings

- Click the Open button
- Click Yes if you see the following warning message:

- Enter your password to login (there will be no * indicating you are typing but it is accepting the inputs)

- If the login was successful you should see something similar to
(instead of rws2p you will see your username instead) :

- FINALLY: test to make sure everything is working by typing: idle3 &
into the command line and pressing enter.
You should see the IDLE environment appear:

NOTE: In the future you will be able to just select the profile and click load, then click open, instead of checking every setting first.