What is the difference between a novel and a book? They really aren't the same thing! A novel is a relatively long fictional prose story. A book is a bound collection of pages. A novel is often published as a book - but it can also exist on microfilm or be stored electronically. Thus a novel is an abstract entity, whereas a book is one concrete way of implementing that entity.
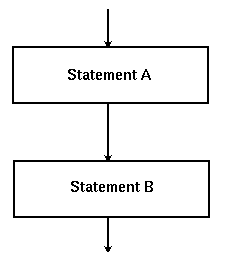
Control Logic Structures are similarly abstract. When we speak of the control logic structures of Sequence, Selection, and Repetition (illustrated below)
| Sequence | |
| Selection |  |
| Repetition | 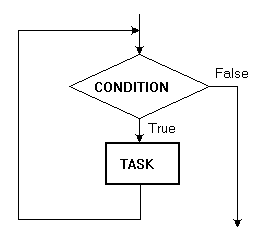 |
Why are these three control logic structures important? To explain fully, we first have to define the term proper program:
A Proper Program has the following four characteristics:Don't worry about the one entry/exit point stuff. No dead code means a program does not contain code that is inherently unreachable and thus unexecutable. No eternal loops means no loops that are designed to run forever.
- has one entry point,
- has one exit point,
- contains no dead code, and
- contains no eternal loops.
Please do not get hung up on the adjective proper; this is a formal term and does not mean "good" or "desirable" - it simply means the program possesses the four characteristics given above. However we will argue that proper programs are probably the only programs we are interested in coding, at least in this course. A program that never ends is not very useful (it is hard to hand in the execution results) and why would we want to insert dead code into a program?
Now that we know the formal meaning of proper program, and that these are the types of programs we want to construct, we finally get to what is probably the most significant discovery in computer science, at least as far as programming is concerned: the Structure Theorem. The Structure Theorem was first proven in 1961 by two Italian computer scientists, Corrado Böhm and Giuseppe Jacopini. However it went virtually unnoticed until Edsger Dijkstra wrote a paper in 1968 about the theorem's practical consequences. The following version of the the Structure Theorem is based on Linger, Mills, and Witt (1975):
The Structure Theorem - Any proper program can be constructed using only three control logic structures: sequence, selection, and repetition.
The major value of the Structure Theorem is in its proof that only a small set of control logic structures, suitably composed, can build any program we are interested in constructing. This is as important to computer science, as Dalton's atomic theory (that all matter in the universe is composed of atoms) was to chemistry.
The term Structured Programming was originally coined to describe the style of programming where programs were designed and built using only this limited set of control logic structures. You have been doing structured programming since the beginning of the course. Previously, you have been introduced to the C++ IF statement that provides a concrete way of implementing the selection control logic structure. You have also seen the C++ WHILE statement that provides a concrete way of implementing the repetition control logic structure. Sequence is provided by just listing one statement after another. Consequently, you have learned enough C++ so that, in theory, you are now able to write a program to solve any problem you will ever be given!
Of course, theory is one thing and practice is another. For example, in theory, if you can walk, you can travel by foot to the southern tip of South America. But in practice, issues of cost and convenience are very important. Although all proper programs can be built using just the control logic constructs of sequence, selection, and repetition, it is convenient to add two additional control logic structures to our toolkit: case and repeat-until. We shall consider these two new constructs, and ways of implementing them in C++, in the following sections.
However, many times in designing a program it is convenient to consider directing the flow of control among more than two alternatives. The case control logic structure, also called multiple alternation, involves selecting from multiple (more than two) alternative actions. For example, the following flowchart depicts a case control logic structure that increments different counters depending on the value of a code variable.
| Case | 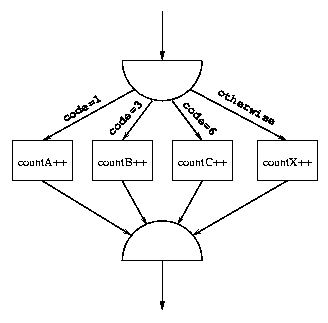 |
The C++ IF statement provides one concrete way of implementing
the case control logic structure.
The case flowchart logic above could be implemented with the following code:
         if (code==1)
             countA++;
         else
             if (code==3)
                 countB++;
             else
                 if (code==6)
                     countC++;
                 else
                     countX++;
The indentation of the code above does a poor job, however, of
revealing the inherent case logic. That is, the indentation does
not clearly reveal that each incrementation is one of a set of
mutually exclusive alternatives.
The multiway IF indentation scheme would reveal this
much more clearly and compactly:
         if (code==1)
             countA++;
         else if (code==3)
             countB++;
         else if (code==6)
             countC++;
         else
             countX++;
To emphasize to someone reading the code that the same value
is being testing in each IF statement, often the boolean expression
(predicate) in the first IF is shifted a little to the
right so as to align with the following boolean expressions.
Also, a C++ comment can be appended to the last ELSE
explaining the conditions under which the last alternative is executed.
The code would then look like this:
         if      (code==1)
             countA++;
         else if (code==3)
             countB++;
         else if (code==6)
             countC++;
         else // otherwise
             countX++;
Any case control logic structure can be implemented using nested IF statements as illustrated. However, in certain circumstances, another C++ statement may also be used to implement multiple alternation: the SWITCH statement.
         switch (expression)
         {
             case Label1:
                 statement(s)1;
                 break;
             case Label2:
                 statement(s)2;
                 break;
             ... etc. ...
             case Labeln-1:
                 statement(s)n-1;
                 break;
             default:
                 statement(s)n;
                 break;
         }
char, short, int, long, bool).
Each case Label
must be an integral constant value, usually a literal or named constant.
To illustrate and explain the use of the SWITCH statement, we use it to reimplement the case flowchart logic from the previous section.
|
|
Note:
The keyword
break;
in a switch is very important!
If the break is omitted following a statement sequence,
then execution will continue, or fall through to the next statement(s).
Ordinarily this is undesirable and an error.
However, when several cases share the same outcome,
we can use this feature to simplify our coding.
For example, a letter grade in this course of D or F
requires a computer science major to retake the course.
Rather than duplicate the code for each alternative,
we can omit the break; on one of the cases and
have execution drop down to the following alternative.
The following code illustrates such a use; assume the variable
letterGrade is of type char:
         switch (letterGrade)
         {
             case 'A':
                 cout << "Excellent" << endl;
                 tallyA = tallyA+1;
                 SendScholarshipLetter();
                 break;
             case 'B':
                 cout << "Good" << endl;
                 tallyB = tallyB+1;
                 break;
             case 'C':
                 cout << "Passing" << endl;
                 tallyC = tallyC+1;
                 break;
             case 'D':
             case 'F':
                 cout << "Unsatisfactory" << endl;
                 cout << "You must retake the course" << endl;
                 tallyNoPass = tallyNoPass+1;
                 break;
             default:
                 cout << "Error in letter grade: "
                      << letterGrade << endl;
                 break;
         }
Here is another example:
         switch (size)
         {
             case 6:
             case 7:
             case 8:
             case 9:
             case 101:
                 cout << "big";
                 break;
             case 1:
             case 2:
             case 3:
                 cout << "small";
                 break;
             case 4:
             case 5:
                 cout << "medium";
                 break;
             default:
                 cout << "Error"
                 break;
         }
         cout << endl;
| if colorval is | display this color |
|---|---|
            $ script lab7ex4.log
            $ pr -n -t -e4 cla7a.cpp
            $ c++ cla7a.cpp -o cla7a
            $ cla7a
            1
            $ cla7a
            2
            $ cla7a
            3
            $ cla7a
            4
            $ cla7a
            5
            $ cla7a
            6
            $ cla7a
            0
            $ exit
However, many times in designing a program it is convenient to use a loop in which the condition is tested at the end of the loop. The repeat-until control logic structure is a looping construct that exhibits such behavior. For this reason, we sometimes identify this as a one or more times loop, because the boolean expression is not even evaluated until one iteration of the loop has occurred. The following flowchart graphically depicts the repeat-until control logic structure. Notice that the loop is exited when the loop condition evaluates to true.
| Repeat-Until | 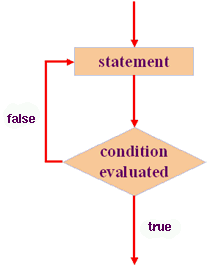 |
Interestingly, C++ does not have a statement that exactly implements this abstract control logic structure! This in some ways reflects the age of the language C from which C++ derives its control statements. At the time that the C language was created, structured programming was only beginning to emerge as the dominant style of programming. Most later languages, such as Pascal and Ada, do have statements that directly implement the repeat-until control logic structure; in fact, in Pascal the statement is called the repeat-until statement. So why bring this up in a lab dealing with C++? Simply to point out once again that a control logic structure as a concept is different from the statement(s) that may implement the structure.
It turns out that C++ does have a statement that comes very close to implementing the repeat-until. This statement is the DO-WHILE statement. The C++ DO-WHILE statement implements a looping control structure in which the loop condition is tested at the end (bottom) of the loop.
| do-while | 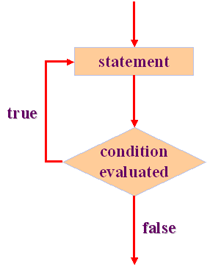 |
The DO-WHILE statement has the general form:
         do
         {
             ... loop body statement(s) ...
         } while (expression);
The DO-WHILE loop is not commonly used.
A survey of the UNIX operating system software revealed that
of all the loops found in the code,
only about 4% were DO-WHILE loops.
Even so,
there are times where a DO-WHILE loop
is the most appropriate looping construct to use.
As an example of a situation that might use a DO-WHILE loop,
suppose we had been reading and processing character data from a line and now
simply wished to print the remainder of the line to standard output.
The strategy would be to read and print a character at a time
until we had run out of line; that is, until we had read and output
the terminating newline ('\n') character.
Notice we have to read (and print) at least one character to determine
if we have finished processing the line.
Using a DO-WHILE loop, the code would look like:
         do
         {
             cin.get(ch);
             cout << ch;
         } while (ch != '\n');
         for ( initialize ; expression ; update )
         {
             ... loop body statement(s) ...
         }
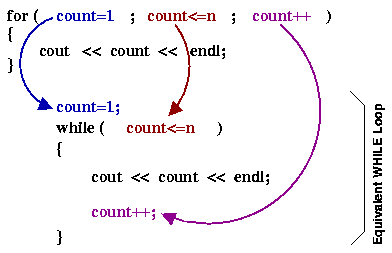
The FOR statement is said to implement a pre-loop test because the boolean expression that determines whether an iteration of the loop is to be done is evaluated prior to the execution of the loop body. This is the same as a WHILE loop. This is because the FOR statement is merely a compact version of a WHILE loop!
Consider the FOR loop below that prints out, one number per line,
the integers from 1 to n.
The FOR starts by executing (but only once on entry) the
initialization section - in this example, count=1.
Next the boolean expression count<=n is evaluated.
If false, the loop is exited.
If true, the loop body is executed.
After the entire loop body is executed, the modification section
is executed - in this example, the variable, count,
is incremented by one.
 |
Consider the following FOR loop examples:
         for (int i=1; i < 10; i=i+2)
             cout << i << endl;
         for (int j=2; j < 5; j++)
         {
             cin >> x;
             cout << x << endl;
         }
         for (int n=10; n>0; n--)
         {
             cout << n << endl;
         }
         for (k=2; k<=1024; k = k * 2);
             cout << k << endl;
         for (k=2; k<=1024; k = k * 2)
             ;
         cout << k << endl;
         for (len=9; len>=1; len--)
         {
             for (num=1; num<=len; num++)
                 cout << num;
             cout << endl;
         }
         123456789
         12345678
         1234567
         123456
         12345
         1234
         123
         12
         1
         for (int k=-5; k<0; k++)
             cout<< k + 2 << endl;
             cout<<"HELLO";
The continue; statement
can only be used with looping statements.
Executing a continue; causes the program
to skip to the next iteration of the loop.
Essentially it causes the remainder of the
loop body code to be skipped for this iteration.
Thus in a WHILE or DO-WHILE, it means the condition test
is executed immediately.
When used in a FOR statement,
the continue; causes the
update section to be executed immediately
followed by an evaluation of the test condition.
The use of the continue; in programming is also rare.
The usual circumstance warranting the use of a continue;
is when the part of the loop that follows is extremely complicated
and deeply nested,
so that adding an IF statement to bypass this code
and indenting another level would nest the program too deeply.
Consider the following example:
         for (int row=0; row<1024; row++)
         {
             for (int col=0; col<512; col++)
             {
                 if (row==col)
                     continue;
                 ... other loop body statement(s) ...
             }
         }
I, student name, pledge not to use "break;" nor "continue;" inside loops while in this course.
            $ script lab7ex10.log
            $ pr -n -t -e4 cla7b.cpp
            $ c++ cla7b.cpp -o cla7b
            $ cla7b
                 ...the data you enter...
            $ exit
            $ handin "lab7log" lab7ex4.log lab7ex10.log
From the PC you are working on, you must also submit the answer sheet (AnswerSheet7.pdf) using the following directions:
Congratulations!
You have finished Lab 7.